Easy St Patrick’s Day Cookies – Fun & Festive Treats
Easy St. Patrick’s Day Cookies are the perfect way to add a touch of festive fun to your celebrations without any fuss! Who doesn’t love a simple, delicious treat, especially when it’s dressed up in its holiday best? These delightful cookies are a crowd-pleaser, beloved for their straightforward preparation and satisfyingly sweet flavor. What truly makes these Easy St. Patrick’s Day Cookies special is their adaptability – whether you’re a seasoned baker or just starting out, you’ll find yourself whipping up batches with ease. They’re designed to bring a smile to your face and a bit of Irish cheer to your kitchen, making them an indispensable part of any St. Paddy’s Day gathering. Get ready to discover how simple and enjoyable it can be to create these charming treats!
Why You’ll Love These Cookies:
Simple ingredients, big flavor.
Minimal prep time, maximum festive impact.
Perfect for kids and adults alike.
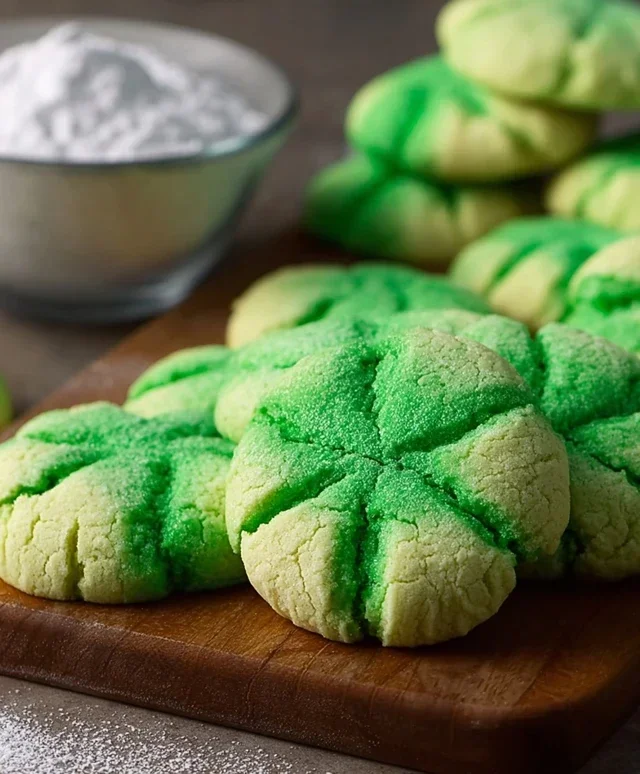
Easy St. Patrick’s Day Cookies
Get ready to celebrate St. Patrick’s Day with a batch of these incredibly easy and delightfully festive green cookies! These aren’t your average sugar cookies; they’re a shortcut miracle that tastes just like homemade, but without all the fuss. We’re talking about a recipe that comes together in minutes, uses minimal ingredients, and results in perfectly soft, chewy, and vibrant green cookies that are guaranteed to bring a smile to everyone’s face. Whether you’re a baking novice or a seasoned pro looking for a quick and cheerful treat, these St. Patrick’s Day cookies are your golden ticket. They are perfect for school parties, office gatherings, or simply enjoying a little bit of festive cheer at home. The secret to their simplicity lies in using a white cake mix as the base, which gives them a wonderfully tender crum extractb and a slightly sweet flavor that pairs beautifully with the simple glaze. Let’s get our green on and bake up some magic!
Ingredients:
Baking the Dough
The foundation of these easy St. Patrick’s Day cookies is the simple batter. We’re going to combine just a few key ingredients to create a dough that’s both easy to handle and incredibly flavorful. The white cake mix is the star here, providing a fantastic texture that’s light and slightly cakey. When combined with eggs and oil, it forms a wonderfully pliable dough. The addition of green gel food coloring is what truly transforms these into St. Patrick’s Day delights. Gel food coloring is preferred over liquid as it provides a more concentrated and vibrant color without adding extra moisture that could alter the cookie’s texture. Be sure to start with a small amount and add more gradually until you achieve your desired shade of festive green. Remember, a little goes a long way with gel coloring!
Step 1: Combine Wet Ingredients and Coloring
In a medium-sized mixing bowl, begin extract by cracking your two large eggs. Add the 1/3 cup of vegetable oil to the eggs. Now, it’s time to introduce the magic of color! Carefully add the 1/4 teaspoon of Kelly green gel food coloring to the egg and oil mixture. Using a whisk or a fork, vigorously stir these ingredients together until the color is evenly distributed and there are no streaks of yellow or white remaining. You want a uniform, vibrant green liquid. This step is important to ensure that the color disperses evenly throughout the cookie dough and you don’t end up with green splotches.
Step 2: Incorporate Cake Mix
Once your wet ingredients are beautifully colored, it’s time to add the dry component. Pour the entire contents of the 1-box (15.25 oz) white cake mix into the bowl with the green liquid. You can use a wooden spoon, a sturdy spatula, or an electric mixer on a low speed to combine the ingredients. Start by gently mixing until most of the dry cake mix is incorporated. Be careful not to overmix at this stage. Overmixing can develop the gluten in the flour, leading to tougher cookies. We’re aiming for a dough that just comes together. It should be thick and slightly sticky.
Step 3: Form and Chill the Dough
This dough is quite soft, so chilling it slightly will make it much easier to handle and shape. Scoop out rounded tablespoons of the dough. You can use a cookie scoop for consistent sizing, or simply use two spoons. Gently roll each portion of dough into a ball between your palms. If the dough is too sticky, you can lightly dampen your hands with water or dust them very lightly with a bit of extra cake mix. Once you have your balls of dough, place them onto a baking sheet lined with parchment paper, leaving about 2 inches of space between each cookie to allow for spreading. Pop the baking sheet into the refrigerator for about 15-20 minutes. This chilling step helps the cookies hold their shape better during baking and prevents them from spreading too much.
Step 4: Baking the Green Gems
Preheat your oven to 350 degrees Fahrenheit (175 degrees Celsius). While the oven is preheating, take your chilled cookie dough balls and gently press them down onto the parchment-lined baking sheet. You don’t need to flatten them completely; just a gentle press will do. This helps them bake more evenly. Bake the cookies for 9-12 minutes, or until the edges are set and lightly golden, but the centers still look slightly soft. It’s important not to overbake these cookies, as they will continue to firm up as they cool. The goal is a soft, chewy cookie, so err on the side of underbaking if you’re unsure.
The Sweet Finish: A Simple Glaze
While the cookies are cooling, we’ll prepare a simple, sweet glaze that adds a delightful finishing touch. This glaze is incredibly easy to make and elevates these simple cake mix cookies into something truly special. The powdered sugar creates a smooth, sweet coating that complements the cakey texture of the cookie perfectly.
Step 5: Prepare and Apply the Glaze
Once your cookies have baked and are cooling on the baking sheet for a few minutes, carefully transfer them to a wire rack to cool completely. While they are cooling, prepare the glaze. In a small bowl, combine the 3 tablespoons of granulated sugar and the 6 tablespoons of powdered sugar. Gradually add a tablespoon of water (or milk for a creamier glaze), stirring until you achieve a smooth, pourable consistency. You want the glaze to be thick enough to coat the cookie but thin enough to drizzle. If it’s too thick, add a tiny bit more water; if it’s too thin, add a little more powdered sugar. Once the cookies are completely cool, you can either dip the tops into the glaze or use a spoon to drizzle it artfully over each cookie. For an extra festive touch, you can even sprinkle them with some green sprinkles before the glaze sets. Let the glaze set for at least 15-20 minutes before serving. Enjoy your delicious, easy St. Patrick’s Day cookies!

Conclusion:
There you have it – a simple yet utterly charming way to celebrate St. Patrick’s Day right in your own kitchen! These Easy St. Patrick’s Day Cookies are a fantastic choice for bakers of all skill levels. Their straightforward nature means less stress and more fun, making them perfect for a family baking session or a quick treat to whip up before a festive gathering. The delightful green hue, whether from natural ingredients or a touch of food coloring, instantly brings that festive St. Patrick’s Day spirit to life. Plus, the customizable nature of these cookies means you can adapt them to suit your preferences.
I encourage you to give this recipe a try. You’ll be delighted by how easy it is to create something so festive and delicious. They are wonderful served alongside a cold glass of milk, a warm cup of tea, or even as a sweet accompaniment to a festive brunch. Feel free to experiment with different sprinkles – sbeef hamrocks, gold coins, or even rainbow-colored ones – to add an extra layer of fun. You could also try adding a hint of lime zest to the dough for a brighter flavor profile. Let your creativity shine and make these cookies your own!
Frequently Asked Questions:
Can I make these cookies ahead of time?
Absolutely! These cookies store beautifully. Once completely cooled, keep them in an airtight container at room temperature for up to 3-4 days. This makes them perfect for preparing in advance for your St. Patrick’s Day festivities.
What if I don’t have green food coloring?
No problem at all! You can achieve a lovely green color naturally by using matcha powder (start with about 1-2 teaspoons for color and a subtle flavor) or by finely pureeing a small amount of spinach and squeezing out the excess liquid before adding it to the dough. The flavor will be very mild.
Can I add other flavors to these cookies?
Definitely! While the basic recipe is delicious, feel free to get creative. A teaspoon of vanilla extract is always a good addition. For a subtle mint flavor, you could add a few drops of peppermint extract. For a citrusy twist, a little lemon or lime zest would also be lovely.
Easy St. Patrick’s Day Cookies
Simple and vibrant green cookies perfect for St. Patrick’s Day celebrations, made with cake mix for ultimate ease.
Ingredients
-
1 box (15.25 oz) white cake mix (about 3 cups)
-
2 large eggs
-
1/3 cup vegetable oil
-
1/4 teaspoon Kelly green gel food coloring
-
3 tablespoons granulated sugar
-
6 tablespoons powdered sugar
Instructions
-
Step 1
Preheat oven to 350°F (175°C). Line baking sheets with parchment paper. -
Step 2
In a medium bowl, combine the white cake mix, large eggs, and vegetable oil. -
Step 3
Add the Kelly green gel food coloring and mix until the dough is uniformly colored. -
Step 4
Roll rounded tablespoons of dough into balls and place them on the prepared baking sheets, about 2 inches apart. -
Step 5
In a small bowl, combine the granulated sugar and powdered sugar. Roll each cookie dough ball in the sugar mixture. -
Step 6
Bake for 10-12 minutes, or until the edges are lightly golden. -
Step 7
Let the cookies cool on the baking sheets for a few minutes before transferring them to a wire rack to cool completely.
Important Information
Nutrition Facts (Per Serving)
It is important to consider this information as approximate and not to use it as definitive health advice.
Allergy Information
Please check ingredients for potential allergens and consult a health professional if in doubt.