Cherry Pie Bombs- Easy Decadent Bites
Cherry Pie Bombs are an absolute showstopper, a delightful twist on a classic that I can’t wait for you to try. Forget everything you thought you knew about pie because these little flavor explosions are about to revolutionize your dessert game. Imagin extracte the comforting, sweet-tart burst of cherry pie, condensed into perfect, bite-sized parcels of pure joy. That’s the magic of Cherry Pie Bombs! They’re incredibly popular because they capture all the nostalgic goodness of Grandma’s homemade pie but are so much more convenient to serve and enjoy. What truly makes these Cherry Pie Bombs special is the delightful contrast of textures: a flaky, buttery crust giving way to a gooey, intensely cherry filling. They’re the perfect single-serving indulgence, ideal for parties, picnics, or just when you need a little bit of happiness delivered straight to your taste buds.
Get ready to fall in love with these.
Let’s get baking!
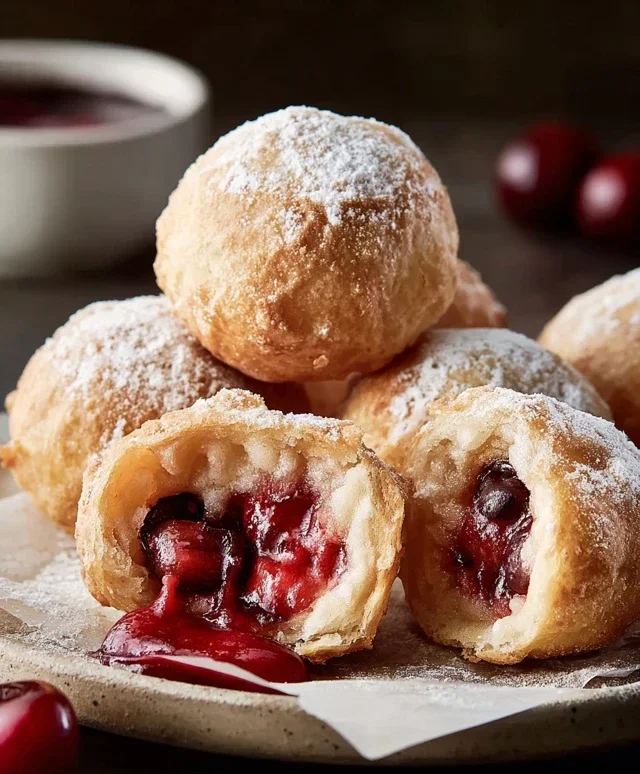
Cherry Pie Bombs
Get ready to experience a burst of sweet, tangy cherry goodness with these incredible Cherry Pie Bombs! These delightful treats are essentially mini cherry pies, but with a playful, bite-sized twist. They’re ridiculously easy to make, thanks to the magic of canned biscuits, and are sure to become a fast favorite for any occasion. Imagin extracte warm, flaky pastry encasing a molten cherry filling, all drizzled with a sweet glaze – it’s pure bliss! Perfect for parties, potlucks, or just a special treat to brighten your day, these Cherry Pie Bombs are guaranteed to disappear in a flash.
Ingredients:
Cooking Instructions:
Let’s get started on creating these little explosions of flavor! The process is surprisingly simple, and the results are absolutely worth it.
Preparing the Biscuits and Filling
First, we need to get our biscuit dough ready. Open the can of Grands “Big” biscuits. These are the larger, flakier variety, which gives us the perfect canvas for our pie bombs. Gently separate the biscuits. For each biscuit, I like to flatten it out a bit with my hands or a lightly floured rolling pin. You want to make it thin enough to wrap around the cherry filling but not so thin that it tears easily. Think of it like making a little dough pocket. Now, spoon a generous amount of the cherry pie filling into the center of each flattened biscuit. Don’t be shy with the filling – that’s where all the deliciousness is! Carefully bring the edges of the biscuit dough up and around the cherry filling, pinching them together firmly to seal. You want to ensure there are no gaps where the filling can escape during frying. A good pinch is key to creating a senon-alcoholic aled “bomb.” If any edges seem a little tricky to seal, you can try moistening them slightly with a tiny bit of water to help them stick. Roll the senon-alcoholic aled dough ball gently in your hands to ensure it’s a neat little package. Repeat this process with all your biscuits and remaining cherry pie filling.
Frying the Cherry Pie Bombs
Now for the fun part: frying! You’ll need a heavy-bottomed pot or Dutch oven for this. Pour enough vegetable oil into the pot to generously cover your pie bombs – you want them to be fully submerged so they cook evenly and get that beautiful golden-brown crispiness all around. Heat the vegetable oil over medium-high heat until it reaches about 350°F (175°C). If you don’t have a thermometer, you can test the oil by dropping a tiny piece of biscuit dough into it. If it sizzles and floats to the top immediately, the oil is ready. Carefully, and I mean carefully, lower 3-4 pie bombs at a time into the hot oil. Don’t overcrowd the pot, as this will lower the oil temperature and lead to greasy, unevenly cooked bombs. Use a slotted spoon or spider strainer to gently place them in. Fry them for about 2-4 minutes per side, or until they are a deep golden brown and puffy. Keep an eye on them, as they can go from perfect to burnt very quickly! Use your slotted spoon to gently turn them over halfway through to ensure even browning. Once they’re beautifully golden, carefully remove them from the oil and place them on a wire rack set over a baking sheet lined with paper towels. This allows the excess oil to drain off, keeping your bombs nice and crispy.
Making the Glaze
While your Cherry Pie Bombs are cooling slightly, let’s whip up a simple yet delicious glaze. In a medium bowl, whisk together the 2 cups of powdered sugar, ¼ cup of milk, and 1 tablespoon of light corn syrup. The corn syrup is a secret ingredient that adds a lovely shine and helps prevent the glaze from hardening too quickly. Whisk until the mixture is smooth and creamy. You’re looking for a consistency that’s thick enough to coat the back of a spoon but still pourable. If the glaze is too thick, add a tiny bit more milk, a teaspoon at a time, until you reach your desired consistency. If it’s too thin, gradually add a little more powdered sugar. This glaze is the perfect sweet complement to the tart cherries and flaky pastry.
Glazing and Serving
Once your Cherry Pie Bombs have cooled for a few minutes – you don’t want them piping hot, or the glaze will just melt off – it’s time to get glazing! You can either drizzle the glaze over the top of each bomb using a spoon, or you can dip the tops of the warm bombs directly into the glaze. I often find drizzling gives a prettier, more intricate look, and dipping ensures a more substantial coating of sweetness. Either way, be generous! The glaze will set slightly as it cools, creating a delightful sweet crust. For an extra touch, you could even sprinkle some extra red sanding sugar or a tiny pinch of cinnamon over the glaze while it’s still wet. These Cherry Pie Bombs are best served warm, so try to serve them shortly after glazing. The contrast between the warm, gooey cherry filling, the crispy fried biscuit, and the sweet glaze is absolutely divine. They are a perfect standalone treat, but they also pair wonderfully with a scoop of vanilla ice cream. Prepare for some serious “oohs” and “aahs” when you present these!

Conclusion:
And there you have it – your ultimate guide to creating these delightful Cherry Pie Bombs! I truly believe this recipe is a winner because it takes all the beloved flavors of classic cherry pie and transforms them into irresistible, bite-sized treats. The flaky pastry, the sweet and tangy cherry filling, and that hint of warm spice – it’s pure dessert perfection! These little gems are incredibly versatile. They’re fantastic served warm with a scoop of vanilla ice cream for an extra indulgence, or simply enjoyed at room temperature as a sweet pick-me-up. Don’t be afraid to get creative with variations! Consider adding a touch of almond extract to the filling for a sophisticated twist, or even a sprinkle of cinnamon sugar on top of the pastry before baking for added crunch and flavor. I wholeheartedly encourage you to give these Cherry Pie Bombs a try. They’re surprisingly easy to make and are guaranteed to impress your friends and family, or simply be a wonderful treat for yourself. Happy baking!
Frequently Asked Questions about Cherry Pie Bombs:
Can I use fresh cherries instead of frozen?
Absolutely! If you’re using fresh cherries, you’ll want to pit them and then follow the recipe’s instructions for cooking them down. You might need to adjust the cooking time slightly depending on the ripeness of your fresh cherries, aiming for a consistency similar to what you’d achieve with frozen.
How should I store leftover Cherry Pie Bombs?
Once cooled completely, you can store any leftover Cherry Pie Bombs in an airtight container at room temperature for up to 2 days, or in the refrigerator for up to 4-5 days. Reheat them gently in a warm oven or microwave if you prefer them warm.
Cherry Pie Bombs
These delightful ‘bombs’ combine the ease of flaky biscuits with the sweet, tart flavor of cherry pie filling, all coated in a luscious powdered sugar glaze.
Ingredients
-
16.3 ounces Grands “Big” biscuits, flaky
-
21 ounces cherry pie filling
-
Vegetable oil, for frying
-
2 cups powdered sugar
-
¼ cup milk
-
1 tablespoon light corn syrup
Instructions
-
Step 1
Open the Grands “Big” biscuits and separate them. Flatten each biscuit slightly with your hands. -
Step 2
Spoon about 2 tablespoons of cherry pie filling into the center of each flattened biscuit. -
Step 3
Carefully fold the edges of the biscuit around the cherry filling to enclose it completely. Pinch the seams to seal. -
Step 4
Heat vegetable oil in a deep skillet or pot over medium-high heat to about 350°F (175°C). -
Step 5
Gently place the cherry pie bombs into the hot oil, being careful not to overcrowd the pan. Fry for 2-3 minutes per side, or until golden brown and puffed. -
Step 6
Remove the fried bombs with a slotted spoon and place them on a paper towel-lined plate to drain excess oil. -
Step 7
In a small bowl, whisk together the powdered sugar, milk, and light corn syrup until smooth and pourable. Add more milk if needed to reach desired consistency. -
Step 8
Drizzle the glaze generously over the warm cherry pie bombs.
Important Information
Nutrition Facts (Per Serving)
It is important to consider this information as approximate and not to use it as definitive health advice.
Allergy Information
Please check ingredients for potential allergens and consult a health professional if in doubt.